IoT Remote Desktop On Mac: NAT Challenges & Solutions
Are you wrestling with the complexities of accessing your Internet of Things (IoT) devices remotely, especially when they're nestled behind a Network Address Translation (NAT) router on a Mac? The ability to securely and efficiently manage your IoT devices from afar is no longer a luxury, but a necessity in today's interconnected world, making understanding and mastering remote desktop solutions an invaluable skill.
The landscape of remote access is often fraught with challenges. Dealing with a non-functional IoT remote desktop setup behind NAT can quickly morph into a frustrating ordeal, capable of stymieing both seasoned professionals and enthusiastic hobbyists. Solutions such as port forwarding and Virtual Private Networks (VPNs) often come to mind, offering avenues to bridge the gap and establish connections to computers and network devices that are sheltered behind NAT routers or firewalls.
This guide is specifically tailored to the intricacies of IoT remote desktop configurations on macOS. It is a deep dive, exploring the essential elements from initial setup to the practical aspects of configuration, troubleshooting, and optimization. The goal is to empower you with the knowledge and strategies to effectively manage your IoT devices regardless of your location.
- Free Remoteiot Vpc Ssh Raspberry Pi Windows Download Guide
- Remote Iot With Raspberry Pi Aws A Free Download Guide
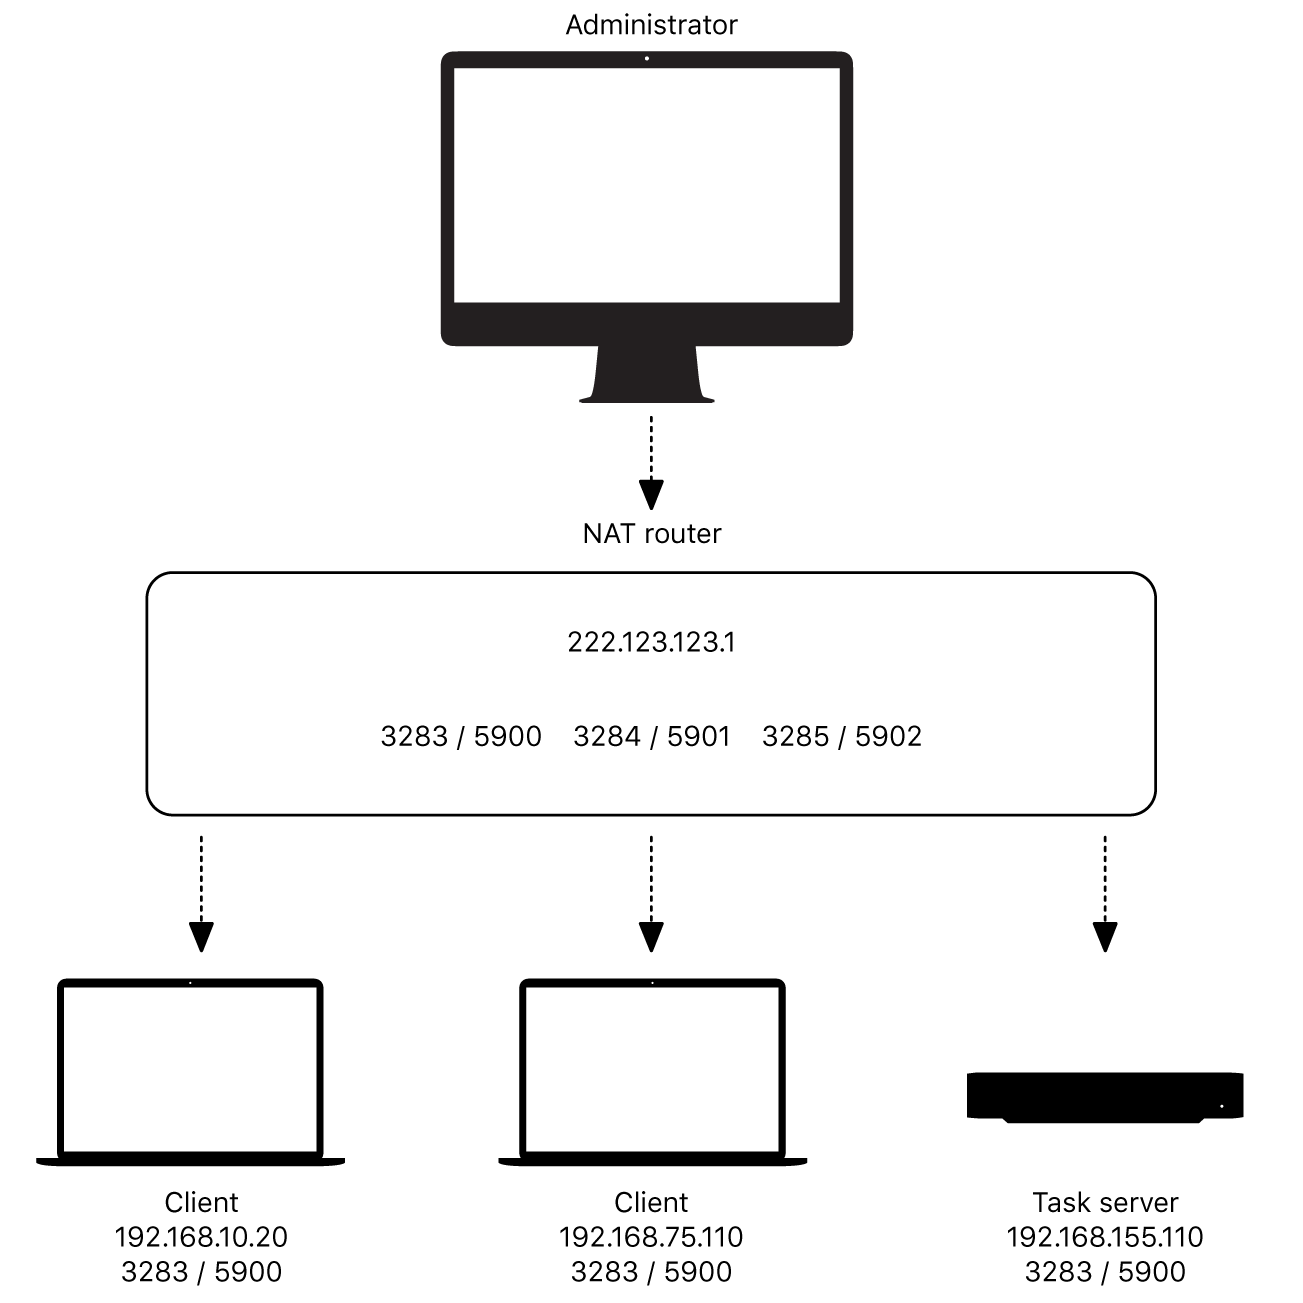
Network Address Translation (NAT) networks, especially those utilizing macOS Internet Sharing, demand specific configuration considerations. If your objective is to utilize a remote desktop to access a task server behind the NAT router, the configuration of your NAT router to enable both TCP and UDP port forwarding for ports 3283 and 5900 becomes a critical step.
The challenge of establishing reliable remote connections on a Mac is amplified by the platforms unique tools and configurations. This guide is designed to provide you with the precise insights and actionable steps needed to achieve a secure remote connection to your IoT devices, even when they're behind a firewall, utilizing a macOS environment.
Beyond the realm of Secure Shell (SSH), there exists a range of supplementary tools and technologies that hold the potential to significantly enhance your remote IoT management capabilities. The utilization of such applications, readily available for a variety of platforms including Windows, macOS, Android, and iOS, offers the advantage of a graphical user interface (GUI) for seamless interaction with your IoT devices. This is particularly advantageous in scenarios where your device is equipped with a screen or necessitates visual monitoring.
- Bhad Bhabie Trump The Connection Explained What You Need To Know
- Movierulz Latest Movie News Reviews Your Picks
However, setting up a remote desktop connection for IoT devices behind a router can be complex, especially for mac os users. Many users face challenges when trying to establish secure and efficient remote connections for their iot devices. This guide will walk you through every step, ensuring your iot remote desktop setup works seamlessly on mac os.
Let's dissect the core concepts and practical methods to effectively establish and maintain an IoT remote desktop setup on your Mac.
To ensure the best user experience, here is a brief summary of the key concepts discussed in this article.
1. Introduction to IoT Remote Desktop: Grasp the fundamental principles and significance of remote desktop access for managing and controlling IoT devices.
2. Challenges of IoT Remote Desktop Behind NAT: Recognize the hurdles and complexities associated with setting up and maintaining remote desktop connections for devices behind NAT routers.
3. Mac-Specific Configurations: Learn about the unique tools and configurations available on macOS that streamline secure remote connections.
4. Step-by-Step Guide: Follow a detailed, practical approach to configure and manage your IoT remote desktops effectively.
5. Troubleshooting and Optimization: Acquire the skills to identify and resolve common connectivity issues, improving the reliability and performance of your remote connections.
6. Alternative Tools and Technologies: Discover supplementary tools and platforms that enhance remote IoT management capabilities beyond basic SSH and RDP.
The process of connecting your IoT devices to a remote desktop via a router on a Mac can sometimes be challenging. This is particularly true when things don't work as expected. Let's dive in and explore the world of IoT remote desktop behind NAT, empowering you to take control of your digital environment.
Before we proceed, it's crucial to understand the basics of remote desktop protocols and network configurations. Two primary protocols are often used for remote desktop connections: Remote Desktop Protocol (RDP) and Virtual Network Computing (VNC). RDP is typically used for Windows environments, while VNC is more versatile and can be used across different operating systems. Both protocols enable you to see and interact with the desktop of a remote device as if you were sitting in front of it.
Network Address Translation (NAT) is a mechanism that allows multiple devices on a private network to share a single public IP address. NAT routers, common in home and business networks, act as intermediaries, translating private IP addresses to a public IP address and vice versa. This poses a challenge for remote access because the public IP address is shared, and the router needs to know which internal device to forward incoming connections to.
To get started, you will need the following: A macOS device (MacBook, iMac, etc.) with a stable internet connection; An IoT device (e.g., Raspberry Pi, Arduino, or any device running a supported operating system) connected to the network; A router that supports port forwarding; RDP client (built-in on Windows and available for macOS) or a VNC client; and a basic understanding of networking concepts.
Now, let's delve into the step-by-step process of setting up your IoT remote desktop connection on your Mac.
The initial step involves configuring port forwarding on your router. This is essential for enabling external devices to connect to your IoT device behind the NAT router. The process varies slightly depending on the router's brand and model, but the fundamental principles remain the same. Here's a general guide:
1. Access your router's configuration interface: Open a web browser and enter your router's IP address (often 192.168.1.1 or 192.168.0.1). You will need your router's username and password to log in.
2. Locate the port forwarding settings: Look for a section labeled "Port Forwarding," "Virtual Servers," or similar in your router's settings. The exact location will vary depending on your router's interface.
3. Create a new port forwarding rule: In the port forwarding settings, you will typically need to provide the following information:
- Service Name: Give the rule a descriptive name (e.g., "RDP to Raspberry Pi").
- Protocol: Select the protocol used by your remote desktop protocol. For RDP, this is usually TCP (port 3389), and for VNC, it is often TCP (port 5900).
- External Port: This is the port you will use to connect to your IoT device from outside your network. You can often use the standard ports (3389 for RDP, 5900 for VNC), or you can choose a different port. If you choose a different port, make sure to note it.
- Internal Port: This is the port your IoT device uses for the remote desktop service (usually 3389 for RDP, and 5900 for VNC).
- Internal IP Address: This is the private IP address of your IoT device on your local network. You can find this by checking the device's network settings.
4. Save the rule: After entering the information, save the port forwarding rule. You may need to reboot your router for the changes to take effect.
Once you have successfully configured port forwarding, the next step is to ensure that your IoT device is properly set up to accept remote desktop connections.
1. Install Remote Desktop Server software: On the IoT device, install the necessary software to act as a remote desktop server. For example:
- For Raspberry Pi: You can install xrdp (for RDP) or a VNC server (e.g., RealVNC, TightVNC).
- For other Linux devices: You can install xrdp, VNC server, or other suitable software.
2. Configure the Remote Desktop Server: Configure the remote desktop server software according to its documentation. This may involve setting a password, enabling the service, and adjusting other settings as needed.
3. Ensure the device is connected to the network: Make sure that your IoT device is connected to the same network as your Mac. You may want to assign a static IP address to the IoT device to prevent its IP address from changing.
On your Mac, you'll need an RDP or VNC client to connect to your IoT device. macOS comes with a built-in Microsoft Remote Desktop client, which is suitable for RDP. You can also download VNC client applications from the App Store or other sources.
Here's how to connect to your IoT device:
1. Open the RDP or VNC client on your Mac.
2. Enter the public IP address or hostname of your network (you can find this by searching "what is my IP" on the web) followed by the port number you configured in port forwarding (e.g., 123.45.67.89:3389 or mydomain.com:5900).
3. Enter your username and password for your IoT device when prompted.
4. If everything is configured correctly, you should now see the desktop of your IoT device and be able to control it remotely.
Sometimes, things might not work as expected. Here's a systematic approach to troubleshooting issues:
1. Check your internet connection: Ensure both your Mac and the IoT device have a stable internet connection.
2. Verify the public IP address: Double-check that you are using the correct public IP address of your network.
3. Check port forwarding rules: Make sure the port forwarding rules are correctly configured on your router.
4. Firewall settings: Ensure that firewalls on both your Mac and the IoT device are not blocking the remote desktop connection.
5. Remote desktop server configuration: Verify the remote desktop server on the IoT device is running correctly.
6. Test with local connection: Try connecting to the IoT device from another device on your local network. If it works locally, the issue may be with your router or port forwarding.
Consider these strategies to optimize your remote desktop experience:
1. Optimize the connection: Reduce the color depth, resolution, and visual effects to improve the connection speed and responsiveness.
2. Use a wired connection: If possible, connect both your Mac and your IoT device to the internet via a wired Ethernet connection instead of Wi-Fi to reduce latency and increase stability.
3. Consider a VPN: If port forwarding proves too complex or if you want an added layer of security, consider using a VPN service. A VPN creates a secure tunnel between your devices and the internet, allowing you to access your IoT device remotely.
4. Evaluate alternative platforms: Explore platform solutions like SocketXP, TeamViewer, or AnyDesk, which are designed to simplify remote device management.
5. Keep Software Updated: Regularly update the software on your IoT devices, your remote desktop clients, and any other applications used to ensure optimal security and performance.
Troubleshooting an iot remote desktop behind nat requires a systematic approach. By following these steps, you can identify and resolve the root cause of connectivity issues. Ensure that your router and firewall are properly configured to allow incoming connections. Check port forwarding rules and ensure they are correctly set for your iot device. Socketxp is a cloud based iot device management and remote access platform.
Here's a table that explains the pros and cons of various methods for remote IoT device access.
| Method | Pros | Cons |
|---|---|---|
| Port Forwarding |
|
|
| VPN |
|
|
| Cloud-Based Solutions |
|
|
| SSH Tunneling |
|
|
Here is a table that will help you in the configuration
| Configuration Steps | Details |
|---|---|
| Find Jetson Nano IP Address | In the terminal, run the command `ifconfig` to identify the IP address assigned to your Jetson Nano. |
| Install XRDP (for RDP) | On the Raspberry Pi or Jetson Nano, install XRDP using the package manager (e.g., `sudo apt install xrdp`). |
| Configure XRDP | Set up XRDP by ensuring it starts automatically on boot and configuring any necessary security settings. |
| Install a VNC Server | Install a VNC server like `tightvncserver` or `RealVNC Server` if RDP is not preferred or supported. |
| Configure the VNC Server | Configure the VNC server by setting a password and potentially adjusting display settings. |
| Network Configuration | Configure the device's network settings to have a static IP address within your local network. |
| Port Forwarding (Router) | Access your router settings and set up port forwarding rules to redirect traffic from the public IP to the device's local IP address and the corresponding port (e.g., port 3389 for RDP, port 5900 for VNC). |
| RDP/VNC Client Setup (Windows/Mac) | On your Windows or Mac machine, install an RDP or VNC client application. |
| Connecting Remotely | Use the public IP address of your network or dynamic DNS hostname along with the forwarded port to connect to the remote device. |
| Web Application Access | For web apps, also ensure that port forwarding is set up for HTTP (port 80) or HTTPS (port 443). Use your public IP or dynamic DNS name in your web browser. |
In addition to the primary methods, let's explore some alternative approaches to enhance remote access to your IoT devices:
1. SSH Tunneling: SSH (Secure Shell) tunneling offers a secure method to create a tunnel through which you can forward traffic. This is especially useful if you have SSH access to your IoT device. You can set up an SSH tunnel to forward the RDP or VNC port to your local machine.
2. Cloud-Based IoT Platforms: Platforms like SocketXP or other cloud-based IoT device management tools provide streamlined remote access and management. These platforms often simplify the setup by eliminating the need for port forwarding and VPN configurations.
3. Dynamic DNS: If your public IP address is dynamic (changes over time), setting up a Dynamic DNS (DDNS) service is recommended. This service provides a stable hostname that always points to your current IP address, simplifying remote connections.
4. Web Applications: Remote access to web applications running on IoT devices or machines on private networks via a secure web browser. Cloud based application also helps to achieve this
5. Remote Command Execution: Platforms like TeamViewer, AnyDesk or SSH also provides the ability to send remote commands

Detail Author:
- Name : Christop Gaylord
- Username : heaney.piper
- Email : arlie40@dooley.biz
- Birthdate : 1976-09-28
- Address : 7845 Bosco Fork Hirtheland, WY 31926-3580
- Phone : +1 (254) 348-0943
- Company : Schuppe Group
- Job : Operating Engineer
- Bio : Et consequatur architecto aut minus doloribus dolores. Quis autem adipisci impedit recusandae laudantium voluptas fugit. Eos pariatur cum optio autem rerum ratione voluptatem ipsa.
Socials
twitter:
- url : https://twitter.com/o'connell1985
- username : o'connell1985
- bio : Rerum odit quasi ut dignissimos laborum alias. Nemo mollitia excepturi et autem id. Sed sint accusamus doloribus nihil id a inventore omnis.
- followers : 5260
- following : 2034
tiktok:
- url : https://tiktok.com/@o'connell1996
- username : o'connell1996
- bio : Consequatur aut optio corporis. Magnam ut exercitationem amet.
- followers : 490
- following : 2338

 devices remotely, especially when they're nestled behind a Network Address Tr)